February 21, 2011

Menu Mondays - A Double Dose...Dinner AND Dessert!

Happy Monday and President's Day to those of you who got the day off!  We have had some great weather here in the Ozarks this past week so my Menu Monday will of course be a bbq recipe!  We love to grill out, I grew up with a father who grilled out regardless of the weather, so when the weather started to turn on Saturday (our planned grilling day), my hubby was bound and determined to still do the grilling!  Lucky for us, as it got closer to grill time, the clouds started to clear a bit and we were even able to eat outside with the added warmth of our firepit to sit around as we had dessert.

On top of the grilling, I am including a bonus recipe...dessert!  My dessert recipe comes from one of my daily Hungry Girl recipes.  Hubby and I love our desserts so when I find a fun, delicious one that is also not going to take away from our gym time, I want to try it.  And we LOVED it and realized I had to add it to Menu Monday this week!  So without further ado...our recipes for the week!

Honey-Glazed Pork Chops
Ingredients:
4 lean pork loin chops
4 tbsp clear honey
1 tbsp dry sherry
4 tbsp orange juice
2 tbsp olive oil
1-inch/2.5cm piece fresh ginger, grated
salt and pepper
corn oil, for oiling


The ingredients cost us very little since we already had almost everything we needed!
 
Directions:Preheat the barbecue.  Season the pork chops with salt and pepper to taste.  Reserve while you make the glaze.
To make the glaze, place the honey, sherry, orange juice, olive oil, and ginger in a small pan and heat gently, stirring constantly, until well blended.
Cook the pork chops on an oiled rack over hot coals for 5 minutes on each side.  Brush the chops with the glaze and cook for an additional 2-4 minutes on each side, basting frequently with the glaze.  Transfer the pork chops to warmed serving plates and serve hot.

 The finished product.  A bit blurry but looks great on our new patio dishes, a wedding gift from Denise & Seth Deitchman!
 Grilling our entire meal made clean up easy.  For this one we decided to use our charcoal grill instead of the gas grill simply for flavor.

A couple of things we learned...next time we will probably double the glaze and use half as a marinade and then use other half as an actual glaze.  It may not work, and even though the flavor was fantastic, we thought it would be fun to try.  And of course...we have leftovers.  We made ours with some grilled broccoli and grilled french bread which was perfect for us since it meant a lot less cleaning!  But what's dinner without dessert?

Sweet Nachos of Mine
Ingredients:
2 medium-large high-fiber flour tortillas with about 110 calories each
3/4 tsp cinnamon, divided
2 dashes salt, divided
1 tsp. powdered sugar
One 60-calorie sugar-free or no-sugar-added vanilla pudding snack
1/4 cup sugar-free pancake syrup
1 cup shopping strawberries
1 cup mini marshmallows
1 tbsp. fat-free or light caramel dip
Optional toppings: Fat Free Reddi-wip, rainbow sprinkles

Directions:
Preheat oven to 375 degrees.  Spray a large baking sheet or ovenproof platter with nonstick spray and set aside.
To make the chips, stack tortillas and cut into quarters.  Evenly cut each stack of quarters into 3 triangles, yielding 24 chip-shaped tortilla triangles.
Evenly lay tortilla triangles flat on the sheet or platter and cover with a generous mist of nonstick spray. Sprinkle with 1/4 tsp. cinnamon and a dash of salt.  Flip triangles, lightly spray with nonstick spray, sprinkle with 1/4 tsp. cinnamon and remaining dash of salt.
Bake in the oven for 3 minutes.  Carefully flip triangles and bake until crispy, about 3 minutes longer, keeping a close eye on them to ensure they don't burn.
Remove baking sheet or platter from the oven, and turn oven to the broiler setting.  Carefully arrange chips so they overlap slightly, and then sprinkle with powdered sugar and set aside.
In a small bowl, combine pudding, syrup and remaining 1/4 tsp. cinnamon, and mix well.  Evenly distribute mixture over the chips as you would cheese sauce when making regular nachos.  Top evenly with strawberries, followed by marshmallows.
Broil until marshmallows being to puff up and turn golden brown, 2-3 minutes.  Remove sheet or platter from the oven and set aside.
Place caramel dip in a small microwave-safe bowl and microwave for about 20 seconds, until hot and drizzle-able.  Give it a stir and drizzle over marshmallows. 
If you like, top each serving with a bit of Reddi-wip and some rainbow sprinkles.

It tasted even better than it looks, if that's even possible!

 
A little more of what we learned...obviously you can tell from the picture that we didn't go with the Reddi-wip, that was just because I am not a fan.  But I am sure it would be a great addition to it.  Everything was fantastic.  The serving size is perfect and it is wonderful.  Just don't plan on saving the leftovers...I can't imagine they would be good the next day!

So, did you make the dinner or dessert?  Tell me how it was!

February 14, 2011

Menu Mondays - Salmon + Asian = Yum!

My husband didn't really eat fish until he met me, although if you ask him he'll say he did.  His definition of seafood was popcorn shrimp and fish and chips.  So I guess I've taken it upon myself to introduce him to as much seafood as possible, but that is easier said than done.  Hubby does love salmon so this next recipe was a no brainer to try!

Weight Watchers puts out a magazine every year that you can find at your local grocery store, called 5 Ingredients 15 Minute Recipes.  It's fantastic, because the recipes are easy, quick and lots of time you already have everything you need in your cabinets.  This recipe was actually from the 2007 magazine, but our side of green beans was from this year's.  All we had to buy was the salmon and hoison sauce for this recipe. We had ginger left over from the Apricot Pork Chop recipe I posted a couple of weeks ago and everything else in the recipe is pretty much a staple item.  When we went to the store, we went ahead and bought the frozen salmon rather than fresh because we weren't sure which day we were going to make it and we also saved about $12 by doing that!  As usual we wanted enough for leftovers and if we had bought the fresh fillets it would have been about $6 a fillet, so $24.  Instead, we spent about $11 on the frozen package which was exactly the size we needed.

Below is the recipe for both the salmon and green beans.  We LOVED both of them and they were so so easy it was crazy.  If you are a full time worker, this is the perfect recipe because the prep time for both is only about 10 minutes, cook time is short as well and you are ready to eat with in 30 minutes of walking in the door! 

All the ingredients for both the salmon and green bean recipes! I bet you already have most of these in  your house!
 
Hoisin and Ginger-Glazed Salmon
Ingredients:
1 tsp grated peeled fresh ginger
2 Tbls hoisin sauce
1 Tbls honey
4 (6-oz) salmon fillets
1/2 tsp salt
1/4 tsp black pepper
Cooking spray
 
Directions:
Preheat broiler.  Combine first 3 ingredients in a small bowl.  Sprinkle fish evenly with salt and pepper.  Place fish, skin side down, on a baking sheet coated with cooking spray.  Brush with hoisin mixture.  Broil 8-10 minutes or until fish flakes easily when tested with a fork.
*My parents made this dish this weekend and grilled their fish...they said it turned out great that way too if you would prefer to grill! 
 
 The finished product.  Pictures can't do it justice, it was so yummy!

Ginger-Roasted Green Beans
Ingredients:
1 (12 oz) package pretrimmed green beans
2 tsp olive oil
2 tsp grated peeled fresh ginger
1/8 tsp salt

Directions:
Preheat oven to 450 degrees.  Combine green beans, olive oil, ginger, and salt on a rimmed baking sheet; toss well.  Spread beans in a single layer.  Bake at 450 for 10 minutes or until crisp-tender.

Told you they were both very easy!  So let me know how your salmon turns out...we will be having our leftovers for dinner this week I'm sure!

February 10, 2011

Valentine's on a Dime

So I am going to confess...I have never been a big "Valentine's" person, so it was pretty easy for me to do a small one this year.  I must also confess, my husband tends to go overboard on gift giving and although we have never had a large valentine's he decided to do a bit too much this year, so we won't be using his examples today (and since I don't know what they are yet that will be pretty easy)!  I gave my gift to the hubby a bit early this year because I wanted to be able to post.

I was originally told we each had a $10 limit but doubled it for my gift to Chris.  Still, at $25 I was able to give him something I knew he would both enjoy but would also last longer than a box of chocolates.  Let's face it, most inexpensive Valentine's Day gifts are geared towards women: chocolate, flowers, stuffed animals, etc.  I wanted to make it personal, but also "practical."  So I give you...the Valentine's Cake Pop.

Cake pops are huge right now, we even had a Cake Pop Co. open its doors here in Springfield after being an online order only company.  Check it out, you can still make online orders and she will ship them to you.  And I can tell you from experience, they are amazing!  After this week's endeavor into making my own, I now give her that much more credit and realize why the cost may seem a bit high (though its really not once you realize the time and effort it takes to make them perfect).

I used the infamous Bakerella recipe and set out to buy my supplies. First stop: Hobby Lobby.  I find that they are a bit cheaper than Michael's and they are also closer to my house.  I picked up some red melting candies, the popsicle sticks, styrofoam and a cute little red and white heart box to put them in.  I also found that I was in love with the Hobby Lobby baking craft isle so don't be surprised if I end up back there again (I can hear my husband's mouth salivating right now). Then it was off to Wal-Mart to find cake and icing.  I did a little paroozing down the Valentine's isle and picked up a bottle of heart shaped sprinkles to put on the pops, then headed to the baking isle.  I really wanted red velvet cake but couldn't find a box mix for it so settled on chocolate cake and icing.  The best part about this special treat is you can make it whatever cake and icing your loved one craves.  Hubby loves vanilla but has never complained about chocolate and I thought chocolate fit the holiday a bit more.  All in all, I spent just about $25 for his gift.

You can check out the recipe yourself on Bakerella, but I've also posted it below.  Let me tell you a little something first...I started at 10:30am by baking the cake.  I finally finished the last pop at about 3pm.  This is a time consuming project, especially since you have to wait for the cake to cook entirely and the melting of the candies takes a bit of time to do it right without burning them.  I can tell you, I could have used more candies.  I made 50 cake pops but still have a few left in the freezer that are in need of candy covering.  Maybe this time I'll let the hubby pick out whatever color he wants (anyone want to put money on if he chooses green to match his Camaro).  The finished product looked a little something like this...not bad for my first ever attempt!


Most importantly, I had a lot of fun making these!  A few suggestions for a Valentine's on a Dime:
- Be creative, whether with food or art.  My hubby loved that I made something and did something fun.
- Do something together.  No need to spend money if you live in a warmer climate, do something outside like hiking or biking or even camping!  If it's colder, stay in, make a dinner together and then make s'mores over the fire in your fireplace with music playing and a bottle of wine.
- Coupon books, though cheesy, can be fun.  For the week or days leading up to Valentine's, leave little notes in your loved ones books, briefcase, even on the bathroom mirror, little "IOUs" and then have them all fulfilled by or on Valentine's Day. 

So...what are your Valentine's day plans?  Are you going all out or keeping it low key? 
--------------------------------------------------------------------------------------------------
Cake Pop Recipe:
1 box cake mix (cook as directed on box for 13 X 9 cake)
1 can frosting (16 oz.)
Wax paper (I used foil and it worked fine)
Candy Melts (1lb pkg...I could have used a little extra)
Lollipop Sticks (50 to be safe)
Any other decorations you want!
  1. After cake is cooked and cooled completely, crumble into large bowl.
  2. Mix thoroughly with 1 can frosting. (I use the back of a large spoon, but it may be easier to use fingers to mix together. But, be warned, it will get messy. Also, you may not need the entire can of frosting, so start out by using almost the entire can and add more if you need to.)
  3. Roll mixture into quarter size balls and place on wax paper covered cookie sheet. (Should make 45-50)
  4. Melt chocolate in the microwave per directions on package. (30 sec intervals, stirring in between.)
  5. Dip the tip of your lollipop stick in a little of the melted candy coating and insert into the cake balls. (Insert a little less than halfway.)
  6. Place them in the freezer for a little while to firm up.
  7. Once firm, carefully insert the cake ball into the candy coating by holding the lollipop stick and rotating until covered. Once covered remove and softly tap and rotate until the excess chocolate falls off. Don’t tap too hard or the cake ball will fall off, too.
  8. Place in a styrofoam block to dry.

-

February 8, 2011

Meet Laurie!

As you may have seen, yesterday I guest blogged on my old friend Laurie Steiner's blog, so today is her turn!  Check out the words of wisdom this 20 something blogger has for all of us!


Meet Laurie!                                
Dreaming Big.

Hello friends! First and foremost, I'd like to take this opportunity to thank Allyson for letting me stop by her beautiful blog today… thank you Allyson! Also, please let me introduce myself. I’m Laurie—a southern-bred 20-something gal who loves chips and salsa, social media, manicures and pedicures, miniature schnauzers, writing, sunshine, traveling, good wine, cold beer and singing in the shower.

I graduated from college four years ago this May, and I must say, it’s hard to believe how far I’ve come in the past few years. What originally began as a post-college public relations job has transformed into a full-blown magazine publishing career complete with social media responsibilities and an eagerness for technology, learning and the ever-changing world around me.

I can safely say that after just a short time of trying to figure it all out, I am pretty comfortable with where I am and who I’ve become. Needless to say, I still have lots of growing to do and can’t wait for what’s ahead. As a young professional like many of you out there, I have aspirations and goals that I wish to achieve.

That being said, I have some personal hopes too. I do the happy dance over the very thought of getting married and having babies. I dream of my own wedding (and live vicariously through beautiful wedding photos like Allyson and Chris have), swooning over the gorgeous brides, handsome grooms, sweet flower girls, pretty tablescapes and beautifully-arranged flowers.


I have a bucket list and hope to get most if not all of those items accomplished at some point throughout my lifetime. I hope I can share those experiences with someone special. I hope I can dream big, live happily, find joy in life’s most precious moments, be a good friend, discover new passions, remember the past, look toward the future and smile every step of the way.

And at the ripe old age of 20-something, I figure, why not take the leap of faith and live every day to the fullest? Here’s to dreaming big and loving every minute of it.

Again, thanks for letting me stop by to say hello. I hope you’ll take a moment to venture over to my little space on the blogosphere and leave a note. I’d love to hear from you.

Have a wonderful week!

February 7, 2011

Menu Monday - Caught in a Snowstorm!

Happy Monday all!  I first want to point out that my long time friend and wonderful blogger, Laurie Steiner, has allowed me to guest blog on her fantastic blog today.  Go and check it out while you're catching up on your blog reading!

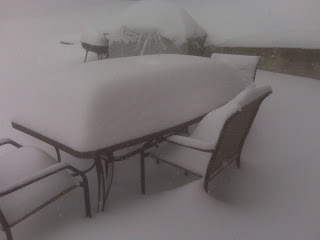
Now on to today's menu, which is a bit different than normal.  Last week we had quite a blizzard here in Springfield, dropping almost a foot and a half of snow on our little midwest city.  As much as people may think we get a lot of snow every year, we usually only get about a foot for the whole year...total.  So you can imagine what 18 inches at once did...school closings, business closing and a seriously stuck newlywed couple.

 Our back deck.  The wall on the right comes up to my mid-thigh.  We got a few more inches after this picture.

Because of the snow I wasn't able to hit the stores in time to try out a new recipe, but wanted to give you all an idea of how we survived the snowstorm without going too crazy by eating the same thing over and over.  When we went to the store before the storm we knew we had to get food that would stretch.  Our last trip to Sam's prepared us without even realizing it because we had enough ground turkey, chicken and pork chops to definitely give us variety and last the week.  We were able to have everything from broiled pork chops to baked spaghetti, and even paninis and wraps because of the few things we picked up at the store.

The last day we were stuck all I was craving was a pizza but the delivery service wasn't coming out to our house still because of the roads. I was a little bitter at first but after going out on the roads the next day I completely understood. I had reached the point where I didn't want to eat anything else we had...I had a craving and that's all I wanted.  We've all been there!  We went into the kitchen to come up with a creative way to put something together and there it was...the Bisquick box.  Chris and I laugh often because we can make pretty much anything with Bisquick (we used it a few times last week for pancakes and waffles).  Right there on the Bisquick box was a recipe for pizza crust!  In the interest of full disclosure, it wasn't as fantastic as a nice crispy pizza crust, but it was great enough to soothe my cravings and give Chris and I a little pizza for dinner that night.

A few things we learned that we would like to pass on:
- Make sure to have 2 or more varieties of meats for dinner so you don't feel like you're eating chicken every night.
- Pasta goes a long way and there are a ton of ways to make it!  We bought two different kinds of pasta for variety.
- Buy things you might not normally buy but you tend to crave (for us it was BBQ and pizza).  Being stuck is tough enough, if you are getting sick of eating the same foods you "always eat" it makes it worse!
- Portion sizes!  We eat small portions to begin with, so we always made leftovers.  They made for great lunches later in the week and we still have some for lunches or dinners this week.

The one great thing about being stuck is realizing how much money we saved by not spending  money on eating out.  We were able to see how easy it is to throw meals together at home and had to eat what we had rather than going out and buying more food even if we didn't necessarily need it.  It's a tip I know we will continue to use as time goes on.  


Here's to hoping no one gets stuck in any more snow storms!  But just in case, what are your tips for stocking up for great variety during snow storms?  Any meals you HAVE to have while snowed in?

February 3, 2011

Introducing...Husband Hour!

Ok, the name is kind of cheesy, but the reasoning is good.  Part of surviving a small budget to live on is having someone who is in your corner.  If my husband didn't support the things I am trying to do to save money as well as my desire to not just find a new job but to find a job I can turn into a career, things would be much more stressful around the household.  Luckily, not only do I have this, but I have a husband who is rather handy!  He and I have been dreaming of ways to improve our little home ever since I moved in.  We have slowly begun making these changes even on our  budget!  Every once in awhile, the hubs will guest blog in order to give you all some ideas on how we improved our home, changed our decor, or even fixed our cars, living on a budget.  When you're married to a man who can build a car from scratch, it definitely helps to keep within the budget!  So without further ado...my amazing, adorable husband, Chris!

Hello to all. As Allyson said, we are doing projects around the house, which is not only economical, but fun! Our first project was the painting of the walls in our living room. We have a smaller home but it is still very open and feels larger than it is. With that, we wanted to choose a color that added to this feeling rather than take away from it. Surprisingly, we actually used a dark color. We picked the maroon color (real name: Bangkok Rust) in our couch pillows. After painting the first wall, we decided the other wall needed it as well. So, the end result was amazing. It actually makes the rooms look bigger. We came to the conclusion the dark color in contrast with the white ceiling showcases the 14 foot ceiling. The end result was we spent less than $50 on everything...paint, brushes, drop cloth, tape, etc. Compare this to the cost of hiring a professional painter to come in and do this job and we saved hundreds of dollars. Not to mention Allyson and I got to work together on a project, which gives us valuable time together. Our other minor projects, with the help of a good friend,  have included installation of new sinks and counter tops in our bathrooms, installation of new dishwasher (this involved firing up power tools!) and a new wall/door going into our master bath. All of these projects started with research and smart shopping, which resulted in tremendous savings. Stay tuned for future projects and savings, especially in the area of manly projects...insert grunting here!

Check out our new walls as well as our new guest bathroom sink and counter tops (the two bathrooms cost us less than $200 for a new door, two counter tops, a new sink and new hardware.  We suggest shopping at wholesale places for all of these pieces, we definitely saved hundreds of dollars doing it this way).

Our first wall.  Loved it so much, we went for a second!

A small section of the 2nd wall/entrance way into our kitchen/dining space.

Our  new counter top, sink and hardware in the guest bathroom. Still a bit of tile work to do around the top, but it looks fantastic already!

 Our new dishwasher on installation day.  We had a great friend install it (this spot used to be 2 cabinets and 2 drawers which he also demolished for us).  We saved SO much money having a friend install.  All that's left is the trim around the outside which we will also do ourselves.